Shop
Shopi’m right there with y’all…the week of thanksgiving is coming and the boys are going to be home without any school stuff for three days before this mama + dad have the long holiday weekend. if you’re like me, you want to try and make sure the kids aren’t on ipads for nine hours a day…so, i’ve put together a few of our favorite thanksgiving crafts your kiddos can do to keep hands busy (no hot glue gun required!)
thanksgiving pear turkeys! 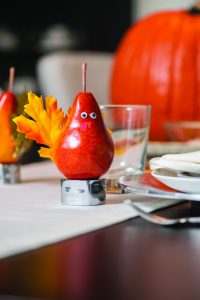
supplies needed:
• fake pears (available at michaels)
• one sheet of red paper
• one sheet of orange paper
• scissors
• elmer’s glue
• small googly eyes
• fabric fall leaves
• tape
these adorable thanksgiving pear turkeys are a breeze to make, and are a super project for toddlers through grade school children! each one can be made to by unique, and will sure be a treat when you and your family sit down to eat!
step 1: prepare all of your supplies, including cutting out small orange triangles from the paper and small teardrop shapes from the red paper. for toddlers, make sure an adult helps and is present when cutting the paper.
step 2: i found it is best to start with attaching the leaves to the pears. select two of the fabric fall leaves. which will be your turkey’s feathers! to adhere, you can either use a small amount of school glue or tape. if using glue, add a small line of glue to the bottom 1/4 of each leaf, and place the leaf on the lower back of the pear at a slight angle (to make it look like the feathers are spreading from your pear’s back!) place the second leaf in the same place on the back of the pear, overlapping on your first leaf. if you choose to use tape (which can be much easier with little ones involved!), you can follow the same placement of the leaves, but use a small strip of tape in place of the glue.
step 3: every turkey needs eyes, and i don’t know about you, but my kids love anything with googly eyes! you’ll need two small googly eyes for each pear, and a small dot of school glue for each. simply add the glue to the back of the eye, and place on the pear to help bring your turkey to life!
step 4: the final addition to your completed thanksgiving pear turkey is to add one small orange beak and one small red turkey neck to your pear. again, a small dab of glue works great on each piece, and then place them centered underneath the googly eyes!
step 5: place a thanksgiving turkey pear at each place setting for your thanksgiving dinner, and enjoy!
•••••••••••••••••••••••••••••••••••••••••••
beaded fall corn cobs 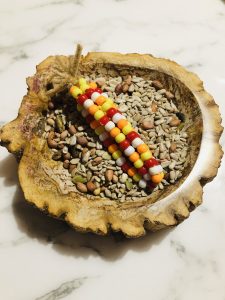
supplied needed:
• assorted pony beads in red, white, orange and yellow
• tan pipe cleaners
i love, love, love when a craft combines fine motor skills + this is the perfect one! plus, after your kiddos make these, they could make a lovely addition to your thanksgiving table decor (maybe at each place setting?!)
step 1: gather together your pony beads and tan pipe cleaners. take three pipe cleaners, and twist them together in the center to make sure they are all twisted around one another. (your pipe cleaners are almost going to look like a big asterisk!)
step 2: on each of the pipe cleaners, start adding your red, orange, yellow, and white pony beads, until there’s about 1″ of pipe cleaner left at the end. fill up every one of the pipe cleaners with the beads.
step 3: once all of the pipe cleaners have beads on them, gather them all together at the ends without the beads and twist the pipe cleaners together to create the top of your corn cob!
step 4: if your corn cob ends are a little long or uneven, you can trim them with scissors to make them even.
•••••••••••••••••••••••••••••••••••••••••••
coffee filter turkeys 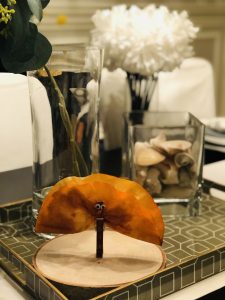
supplies needed:
• white coffee filters
• washable markers (orange, brown, and yellow)
• clothespins
• small googly eyes
• elmer’s glue
• spray bottle with water
• plastic bags
for anyone who’s been doing crafts with me since the summer, you know i love a good coffee filter craft! and, since you can’t buy a small pack of them, i’m always on the lookout so you can use up what you have at home!
step 1: grab one of the white coffee filters along with one plastic bag and your washable makers. lay the coffee filter flat on the plastic bag, and grab the yellow washable marker. starting in the center of the coffee filter, color in the center of the filter with the yellow marker (coloring a circle that is about 2″ in diameter). next, you’ll color in the remaining area of the coffee filter around the yellow circle with the brown and orange markers. you can alternate the brown and orange however you’d like!
step 2: once the coffee filter is all colored in, get your spray bottle and lightly spray the coffee filter with water (while it’s still on the plastic bag!) set this aside to dry (the drying takes about an hour).
step 3: while the coffee filter is drying, we can make our clothespin turkey body! lay one of the clothespins flat on the table, and grab your orange washable marker. on the top part of the clothespin (above the metal), make a small orange, upside down triangle for the turkey’s beak. then, add two small googly eyes with a couple of dots of glue.
step 4: when the coffee filter is dry, fold it in half and clip your clothespin in the center and let the coffee filter fan out in the shape of the turkey’s feathers!
i hope you + your family have a wonderful holiday week and enjoy some time together (and a little creativity)! make sure to share your finished crafts with me on social media by tagging re-nest studio and using the hashtag #craftspluskids 💚 can’t wait to see what you’ve made!