Shop
Shop alright friends, we’re a week out. it’s crunch time. (i know, because i’m in the crunch right now. with y’all.) for me, the last stinking thing that i think about every single year is the stocking. “what do i put in it? what should i get? seriously, no one needs any more sugar, so i don’t want to put more candy in there!” and, to make the whole thing way more anxiety-ridden is this: my mimi (my mom’s mom) had mad stocking game. my mom? even madder stocking game. like, their stockings were/are legendary.
me? i didn’t receive that gene. (i desperately want to have mad stocking game, but i just haven’t gotten there yet.)
so, maybe we can work on our stocking game together? here’s one way i’m helping: my DIY homemade bath bombs. you can make them for anyone in the family (because, seriously who doesn’t occasionally love a bath where you add in a bath bomb that fizzles, smells amazing, and makes your muscles feel better?)
all the supplies + steps are below (and yes, you have plenty of time to get all of this made and wrapped up before next week!)
DIY homemade bath bombs 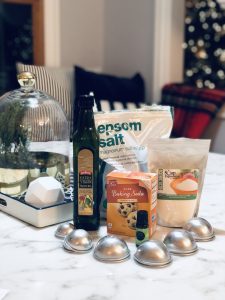
materials needed:
1 cup baking soda
1 cup epsom salt
1 cup citric acid (available at hobby lobby)
2 tsp. olive oil
2 tsp. essential oils (you can choose any scent you like)
bath bomb molds (i found a set on amazon.com. you can also pick these up at michaels.)
bowl
whisk
step #1: measure and mix together the baking soda, epsom salt, and citric acid in the bowl. use the whisk to make sure the three ingredients are well mixed.
step #2: add the olive oil and essential oil to the dry mixture. it’s important to begin to mix the liquid and dry ingredients immediately to make sure all the ingredients are mixed well together.
step #3: once the dry and liquid ingredients are mixed well, it’s important to start filling your bath bomb molds immediately. if you have two-piece molds, take one and fill up the one side with the bath bomb mixture. repeat the same process with the other side of the mold, and press the two sides together. allow the molds to sit overnight for the bath bombs to set.
step #4: after 24 hours, gently twist one of the sides of the bath bomb mold to loosen it from the bath bomb. repeat with the second side of the mold for your completed bath bomb!
to package up, you can wrap them in a cellophane bag and tie with a pretty ribbon! trust me, these will help elevate your stocking game this year!