Shop
Shopthe below diy was written for and published in the july/august 2017 issue of invironments magazine. enjoy!
“The Painted Rocks Craze with Ashley Murcia”
Recently, I was scrolling through my Facebook feed and came across a page that really caught my eye — DeKalb Co. Rocks. What caught my eye wasn’t the name, but rather the image of the brightly painted rocks with really fun designs (I love all things with bright colors!) After more digging, I discovered this new group that spreads encouraging words, helps kids and families exercise their creativity, and offers up a fantastic, non-digital summertime activity!
Painting rocks immediately joined our summer to-do list.
Materials needed:
- Rocks (The best ones have a smooth surface. These can be found out in nature, or you can purchase them at Michaels or Hobby Lobby.)
- Acrylic paint suitable for outdoor use
- Variety of paint brushes in different sizes
- Mod Podge
- Sharpie marker
- Clear coat spray
- Newspaper or scrap paper
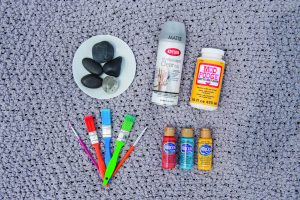
the materials you need to make kindness rocks!
Step 1: If you found your rocks in nature, you’ll want to make sure they are clean and dirt-free. You can clean off rocks by soaking them in a bowl of warm water with a little bit of dish soap. If scrubbing is needed, an old toothbrush is a great tool to use. Allow your rocks to completely dry before starting to paint. (Hint: If you want to speed up the drying process, you can place them in an oven set to 250 degrees for 10 minutes.
Step 2: Once your rocks are dry, it’s time to paint! Set your rock on a piece of newspaper or scrap paper and choose the colors, design, or words you want to include on your rock. (Hint: You can paint the top and bottom of the rock. Be sure to paint one or the other first, and allow the paint to dry before painting the other side. Acrylic paints dry quickly, so that’s a plus!)
Step 3: Once your painting is complete and your rock is dry, it’s time to grab your Sharpie and make sure to mark the bottom of your rock with a fun saying to encourage people to take a picture and share on social media. Examples of what you can add are:
“If found, please share on Facebook @DeKalbCoRocks”
“Follow us on Facebook @DeKalbCoRocks”
Step 4: Apply a coat of Mod Podge to your rock to protect it while outdoors. Use one of your clean paint brushes and allow to completely dry.
Step 5: Start placing your rocks around town, or even on your summertime trips! Our family is leaving rocks around DeKalb and Sycamore, but we also have some special designs planned that will go along on our Disney 2017 trip this fall.

**something else that’s kind of cool:
When I discovered DeKalb Co. Rocks, I had to learn more about the administrators of the Facebook page. Ashley Taylor and Alexandria Carrasquillo started the DeKalb Co. Rocks Facebook page after seeing the idea catch on in St. Petersburg, Florida.
The two women love the fact that the local rocks program provides some wholesome fun for kids and families and helps shift attention away from electronics. They’re seeing reports come in of rock sightings all over DeKalb and Sycamore, including at the DeKalb Public Library. They recommend the following when finding rocks around town:
- Take a photo of your rock discovery.
- Add it to the @DeKalbCoRocks Facebook page and group.
- Post where you found your rock.
- Re-hide the rock in the same or a new location. If you find a rock that has a special meaning to you, keep it — but pay it forward by painting and hiding a rock of your own design!